Background
Whilst the majority of data is sourced from your ERP or other systems via API's, there are many examples where data is stored in flat files or excel spreadsheets that need to be integrated into your data warehouse. Below are some of these examples:
- Board Budgets, Sales Targets and Forecasts
- Location attributes such as floor size by store or area manager store lists
- Product attributes such as aggregating seasons into Next, Current and Past Seasons
- General Ledger Account Master or Cost Centre Files
- Like for like input file containing "is open" flags by location by week
- Image URL mapping files to style colour codes
Please note:
- This article is relevant to all of the above but please note the pre-requisites before you begin.
- Upon successful upload of a file, it will be brought into your Cube the next morning alongside the 'Master Load Refresh'
Pre requisites
- You must have access to your tRS insights portal with admin access
- tRS will need to grant you admin access to the "wrench" icon in the right of the top ribbon
- The upload template must first be set up by tRS for you
Please contact tRS at support@theretailscore.com if you do not meet these requirements.
The Steps
Follow these steps to keep your external upload files up-to-date
1. Log into your tRS Insights Portal.
2. Navigate to the wrench icon, in the Portal Banner

3. Navigate to the Data Uploads and relevant file 
(This page will have all current files that are available for you to upload – If an upload you expect to have does not exist email support@theretailscore.com)
Uploading Document Files
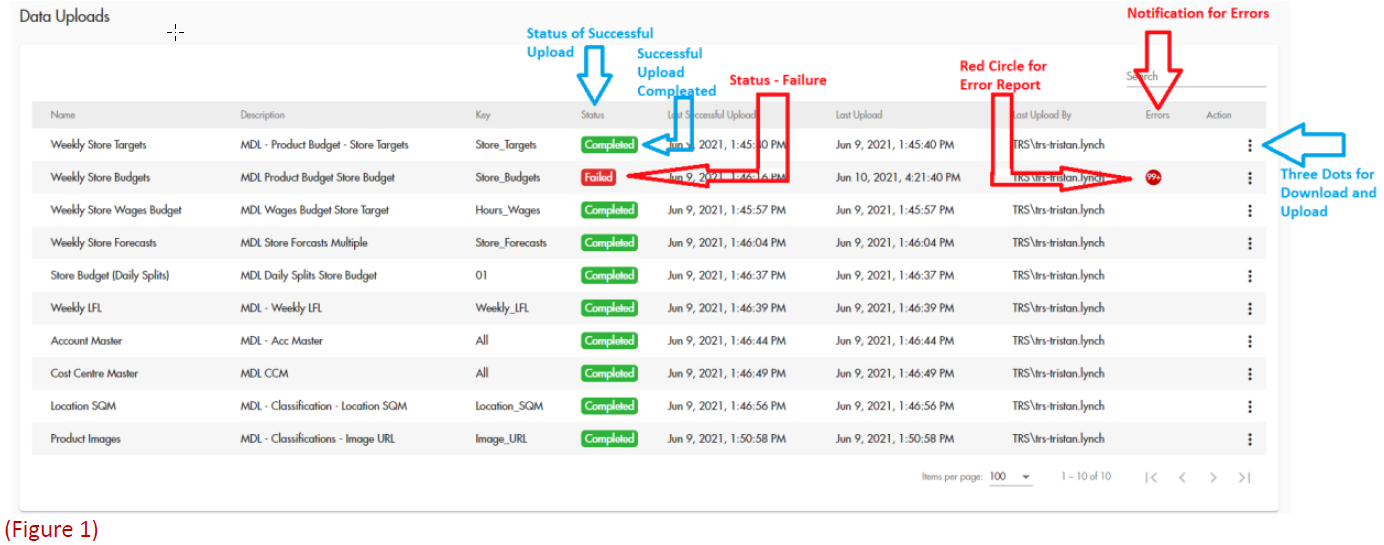
1. Click on the vertical three dots and download the last successful upload
2. Save the file for backup just in case you need to refer to it again
3. Add or update the file as you need too
Warning: Do not add or insert columns into the sheet and follow the instructions above the columns
4. Save As a new file name
5. Go back to the Admin portal and click on the three vertical dots and select upload file
6. The Status will update immediately, showing Completed.
7. Follow the steps if an error during upload occurs or contact support@theretailscore.com
Tip: If the file is unsuccessful, an error log is created that can be accessed by clicking on the icon containing the number of errors. This will guide you to the cells that need your attention.
Opening the file and reviewing the last column of the upload file will also record the errors by row in the workbook.
Warning: Do not leave the upload file in a state of error as this may impact the daily refresh of your data. If you do not have time to fix this, simply click on the three dots to the right of the file and clear the failed upload and re-upload the backup file you saved.
If in doubt, please contact us at support@theretailscore.com